Solar panel installation: A little technical help for motorhome, boat and caravan owners. Part 3
A few notes for anyone considering a solar panel installation on a motorhome, boat or caravan.
We discussed the various types of solar panel installation that can be used on motorhomes, boats and caravans, in the first part of this article. In the second part we looked the most important part of your solar panel system, the solar panel charge controller. In this third part we are going to look at the simple electrical connections needed on a solar panel installation.
Connecting up. It’s easier than it looks!
The connections to be made are straightforward but depend on whether you are installing the solar panel on a motorhome, boat or caravan:
1. Connecting a solar panel installation on a Motorhome or Caravan.
Motorhomes can use either rigid framed solar panels or semi-flexible solar panels, while caravans can only use semi-flexible solar panels. Both types of solar panel have a pair cables already attached. There will be one marked ‘positive’ or ‘+’, and one marked ‘negative’ or ‘-‘. These cables will have ‘MC4’ type connectors already fitted.

The cables have to pass through the roof of the vehicle so it is a good idea to combine the two cables into a single 2-core cable. This way you only have to make one hole through the roof.

2-core cable with MC4 connections
We can supply 2-core cables with MC4 connections already fitted. The 2-core cable can then be passed through a watertight roof gland. The gland is positioned over the hole in the roof and glued in place with Sikaflex 252i adhesive. This gives a thoroughly secure route for the solar cable through the roof of your motorhome or caravan.
The roof gland provides a streamlined solution. Arrange the gland so that the cable exit faces towards the back of the vehicle.

Watertight roof gland
If you later want to add another solar panel there are several MC4 adaptors available to help you with this. To use the adaptor the two new solar panel cables are simply plugged straight into the corresponding MC4 connectors.
The connectors are designed such that the positive and negative cables are correctly connected together.
You can also connect the cables is by using a watertight connection box.
If using a connection box, cut the MC4 connections from the two solar panel cables and pass the cables through the watertight glands on the roof box. The MC4 connections can be discarded.

Watertight connection box
The hole in the bottom of the roof box is positioned directly over the hole in the roof of the vehicle, and the box is glued in place with Sikaflex 252i. A length of two core cable is passed through the hole in the bottom of the roof box and down into the vehicle interior.
The two solar panel cables are joined to the 2-core cable inside the box, using the terminal block connector provided. Make sure that the positive solar panel cable is joined to the red core of the 2-core cable, and that the negative solar panel cable is joined to the black core of the 2-core cable.
One major advantage of using a connection box is that should you ever want to add another solar panel, to improve your independence from campsite supplies, the new panel can simply be passed into the box and connected to the same points as the existing panel.
If using an adaptor the two solar panel cables are plugged straight into the corresponding MC4 connectors. The connectors are already polarised so they cannot be mixed up.
The 2-core cable of the adaptor is passed through the roof of the vehicle via a watertight roof gland. This gland is glued in place over the hole in the roof of the vehicle.
The 2-core cable is then routed to the charge controller.
Should you wish to add another panel to a system that uses MC4 connections, you can connect the new panel using a MC4 Y-branch cable adaptor.
The cable splice comes in two parts. When using a cable splice, work on one part at a time.
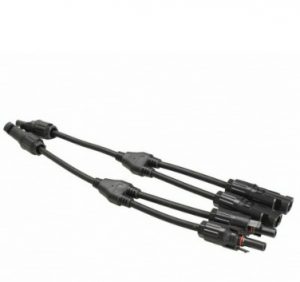
SunWorks Y-branch cable adaptor.
Each part has a single MC4 lead and also a pair of MC4 leads, all connected together. The pair of MC4 leads connect to the solar panels, while the single connector plugs into the 2-core cable.
Unplug the positive solar panel cable from the 2-core cable adaptor. Then connect the single MC4 of the cable splice to the 2-core adaptor positive lead. The other two MC4 connections go to the positive solar panel cables.
Repeat for the second part of the splice.
2. Connecting a solar panel on a Boat.
The connections for a solar panel installation on a boat are very similar to those used on a motorhome (see above).
However, for some marine grade solar panels, such as a Solara marine solar panel, the approach is slightly different. Solara marine solar panels are provided with a 3-core cable which can be passed through the deck of your boat without the need to connect to another cable. Again, either the roof/deck box or the connection gland shown above can be used.

Wiring diagram for a dual battery system
Before connecting to the charge controller, the Solara cable must be connected to the ‘cell protector’ provided with the solar panel. The cell protector should be mounted where it cannot be damaged. A small watertight box, such as the roof/deck connection box shown above, can be used for this purpose.
If you are using a Solara marine solar panel, the output from the cell protector requires a length of 2-core cable to connect it to the charge controller.
Other marine solar panels have the normal two wire connection.
Connection to the charge controller.
PLEASE MAKE SURE THAT THE SOLAR PANEL IS COVERED UP BEFORE YOU CONNECT IT TO THE CHARGE CONTROLLER. The voltage delivered by the solar panel is not usually high enough to harm you but it might be enough to damage any electronics in your boat or vehicle. Once the charge controller is connected to both the solar panel and the batteries, and the battery fuses are in place, it is safe to uncover the solar panels.
The 2-core cable that passes through the roof/deck must be connected to a charge controller (see the wiring diagrams above). The charge controller optimises the charge in the battery and at the same time protects the battery from overcharge. The connection points on the charge controller are usually marked ‘S+’ and ‘S-‘ for the positive and negative connections respectively. So the red wire in the 2-core cable goes to the S+ terminal of the charge controller. Similarly, the black wire in the 2-core cable goes to the S- terminal.
Connection to the battery or batteries.
It is very important to use the correct type of 2-core cable throughout your solar panel installation. We recommend twin core automotive cable of 2.5 sq mm section. This will handle systems of up to 300 watts without excessive power losses or voltage drops.
The charge controller must now be connected to your battery, via a suitable fuse. If you are using a dual battery controller, each of the two outputs from the controller will have to be connected to a battery, via separate fuses.
A dual battery controller will have one output connected to the engine battery and one output to the leisure battery. See the diagrams above.
Next, run a length of 2-core cable from the charge controller output to the battery. This cable can be hidden behind cupboards, lockers, panels or trims. It can also run through plastic conduit, as required. It should be well supported so that it will not be damaged by vibration when the boat or vehicle is travelling. We recommend using a cable support at least every 30 cm, throughout the solar panel installation. Check the manufacturers data as there will be a maximum length for this cable. Be very sure to connect the red wire of the 2-core cable to the controller positive output, and the black wire to the controller negative output.
If using a dual battery controller, repeat for the other battery.

Fused battery harness
To make the connection to your battery easier you can use a ready made fused battery connection harness. This has the battery connections and fuse holder already attached. There is also a terminal block connector for connecting to the controller cable.
Before fitting the battery harness to the battery, attach the 2-core cable. The red wire of the cable connects to the red wire of the harness, and the black wire of the cable connects to the black wire of the harness.
It is very important that the connections from the charge controller go directly to the battery and not via an existing fuse in the vehicle or boat fuse panel. The connections from the charge controller MUST go to the battery terminals to allow the controller to measure the battery voltage reliably and accurately.
