Troubleshooting solar panel systems
We are occasionally asked about troubleshooting solar panel systems on motorhomes, caravans, and boats of all kinds. As a result we have compiled a list of things you can check yourself. If you feel there is something wrong with your solar panel system, perhaps the batteries are going flat too quickly or you are not getting the usual readings from your charge controller display, this guide will help.
We have divided this guide into three parts: Basic, Intermediate and Advanced.
Always start with the basics. Here they are:
Troubleshooting solar panel systems. Basic:
- Check that you have sunshine on your solar panel. The panel should ideally be fully illuminated with direct sunshine. If it is not you will not be getting the most from your solar panel. For example, on an very overcast day your 100 watt solar panel which normally would give you 5 amps will give you less than 1 amp.
- Check for shadows on the solar panel. If a local tree or building is casting a shadow on the panel, or if your tv aerial is affecting part of the solar panel, you will get much less charge than if the panel is evenly illuminated. Just one cell in shadow can block the rest of the solar panel.
- Is the Sun high in the sky? During summer the midday Sun is almost directly overhead. This means that the solar panel is receiving the most energy possible from the Sun, so providing your batteries with lots of electricity. During Spring and Autumn the Sun is lower in the sky and so illuminates the solar panel at an angle. This reduces the energy received by the solar panel and so provides less electricity for your batteries. The situation is worse in the winter when the Sun is very low in the sky. In the UK winter Sun can only generate a fifth of the energy compared to the summer Sun. You can improve the situation by tilting the panels up to face the Sun.
- Battery age. If your batteries are more than 2 years old they will start to deteriorate. If not looked after properly they will be exhausted well before they are 5 years old. As a battery ages it progressively looses its ability to hold charge, so it will run down more quickly. You can test your batteries simply by charging them up fully with a mains powered battery charger (or on-board charger). If they still run down quickly under normal use it’s time to get them checked out professionally by your local garage. It’s worth noting that an older battery will appear to charge up quickly.
- Check the attachment points on the solar panel. These might be metal brackets, plastic corner or end mounts and they might be glued and/or screwed to the roof or deck. They should be very secure.
Troubleshooting solar panel systems. Intermediate:
- Fuses. There should be a fuse between the charge controller and the battery. There may also be a fuse between the charge controller and the solar panel. Before you remove these be sure to cover your solar panel with a blanket or thick towel to de-activate it. Failure to do so could result in damage to your on-board electronics. Check the fuses and replace if in any doubt. Then uncover the solar panel.
- Wiring. Look carefully at the wiring between the solar panel and where it passes through the roof or deck fitting. There should be no chaffing, cracks or splits in these wires. Check also any connectors on the solar panel cables and any connectors in the junction box if you have one. Before doing any work on the wiring, make sure the solar panel is covered and the battery fuses are removed. Check through the wiring inside the vehicle or boat. Again, there should be no visible damage. On a boat also look for salt water damage. This looks like a green powder or growth on exposed wires and connections. Replace any damaged wires or connections. While you are working on the wiring it’s a very good idea to make sure the wires are well supported to prevent further damage by the wind or by vibration.
Troubleshooting solar panel systems. Advanced:
If the above checks do not solve your problem it’s time to do some electrical measurements on the system.
This part of our fault finding guide is intended for those of you who are comfortable with using a basic digital volt meter (DVM) or digital multi-meter. For voltage measurements you will need to set the meter to the 200 VOLT DC range (or nearest equivalent) and make sure that the probes are connected correctly to the DVM. For current measurements set the DVM to the 10 AMP DC range and move the probes to the correct connections on the DVM. If your meter does not have a 10 AMP DC range, do not attempt any of the following current measurements. See the two photos below.
IF YOU ARE NOT COMPLETELY COMFORTABLE WITH USING A DVM DO NOT ATTEMPT ANY OF THE FOLLOWING TESTS. INSTEAD, ASK A QUALIFIED AUTO-ELECTRICIAN FOR HELP.
- Checking the battery connection. In daylight. Measure the voltage on your battery terminals. Then measure the voltage on the battery connections of the charge controller. These should be the same. If not, cover the solar panel and change the battery fuse. Make sure the fuse is seated properly in the fuse holder. Uncover the solar panel and recheck the voltage on the connections of the charge controller. If they are still not the same there is a break in the wiring between the battery and the charge controller. This could be the wires themselves or could be due to a faulty connection or terminal block between the battery and the charge controller. Check along the wires between the battery and charge controller to identify possible problems.
- Solar panel voltage. In daylight. Cover the solar panel and remove the battery fuses. Disconnect the solar panel cable from the charge controller and move the cable away from the controller. Use adhesive tape to prevent the cables from touching anything close by. Uncover the solar panel. Measure the voltage on the solar cables. This should be between 18 and 25 volts. Cover the solar panel and reconnect the cables paying special attention to polarity (unless proceeding to step 3 below). Replace the battery fuses. Uncover the solar panel.
- Solar panel current. In daylight. Cover the solar panel and remove the battery fuses. Disconnect the solar panel cable from the charge controller as in step 2 above. Move the cables away from the charge controller and use adhesive tape to keep the cables away from anything nearby. Set the DVM to the 10 amps range and change the probes as necessary. Connect the probes to the solar panel cable using terminal block or crocodile clips. Uncover the solar panel and read the current. On a bright summers day this should be in the region of 5 amps per 100 watts of solar panel. Cover the solar panels and replace the cable and fuses.
Trouble shooting solar panel systems. Still have a problem?
If you have check out all of the above and have not found the answer to your problem it might be time to consider a new charge controller. Please contact us for more assistance.
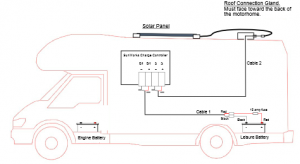
Typical solar panel system on a motorhome or boat.
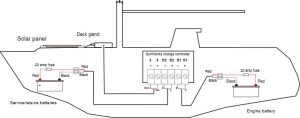
Typical dual battery solar panel system on a boat or motorhome.

DVM set to voltage measurement mode. Dial set to 200 Volts dc. Probes in ‘COM’ and ‘V’

DVM set to current measurement mode. Dial set to 10 Amps dc. Probes in ‘COM’ and ’10 amps’.
